Saturday, September 22, 2012

September 2012 Birchbox

I recently joined Birchbox and just received my second box. I was much more impressed with this month's box.  It's so exciting to see this brown box in your mailbox and know you have all sorts of goodies inside :)


Here's what I received this month:


Birchbox and Color Club® Custom Collection in Tweet Me, which is a chartreuse.


I was actually excited to receive this color, because it's not one I would normally choose for myself.  I actually received a compliment on it the first day I wore it out.


Kate Spade Twirl  : This smells amazing.  It's a light, floral smell that is easy to wear.


LA FRESH® Eco Beauty Acetone-Free Nail Polish Remover - Individual Packets : Work well, but seems easier (and cheaper) to just use a cottonball and remover from Wal-Mart in my opinion.


Mighty Leaf Tea - Tea Pouches : I haven't had a chance to try out these tea flavors, but I'm exited to have 3 to taste!


Jouer Matte Moisture Tint : Love this product! It seems to have a whipped consistency, and goes on very smooth.  Looks great by itself, and gives good coverage without being heavy.


Vasanti BrightenUp! Enzymatic Face Rejuvenator : LOVED how this made my face feel.  It has a really grainy texture and made my skin super smooth. 


Favorite products in this month's box: Vasanti BrightenUp! Enzymatic Face Rejuvenator and Jouer Matte Moisture Tint.  These are two products that I think I will purchase in the future.

Want to join Birchbox too? It's easy! Go to Birchbox and request to be on the waiting list.  Once you receive an email stating it's your turn to subscribe, you get to sign up to receive a monthly box for $10. They also have Birchbox for men (it is $20 a month, but seems to have bigger samples and clothing). You can cancel at any time, so it's worth a shot!

Monday, September 10, 2012

One Year Milestone


The card that David gave me was absolutely perfect. It really describes our long relationship. We met in high school. I was a freshman, and he was a senior. We started dating that following summer (I was 15). We stayed together through about 4 years of long distance dating, never broke up once, supported each others dreams, managed to find full time careers, definately grew up together, and managed to defy the odds and marry our high school sweethearts. I'm proud of where we are today.
It's crazy how fast time goes by.  One year ago today I was getting ready to say, "I Do". 


One year ago, my grandmother, Marnie, was still here to celebrate with my family.  Sadly, she passed away in August, and I still feel her loss. I'm so glad that she was able to be a part of my wedding.


So much has transpired since our wedding, good and bad, but I am so thankful to have my husband by my side throughout all of it.


He is my rock and I feel so lucky that he chose me to become his wife.


Now on to the celebration!  We spent the weekend in downtown Dallas, TX.  We stayed at the Hyatt Regency and we LOVED it! It was so modern and clean!


It had a gorgeous view too, with a chaise lounge right next to the window :)


We had to take a photo in the elevator ceiling mirror lol


We had dinner at Wolfgang Puck's restaurant, Five Sixty. It is in the Reunion Tower, and rotates the entire time so that you see all of Dallas while you eat.


I'd totally recommend checking it out.  I ordered the pork chop and it was delicious!


We had a blast on our trip and we look forward to many more years to come. :)

Tuesday, September 4, 2012

Photo Canvas Tutorial

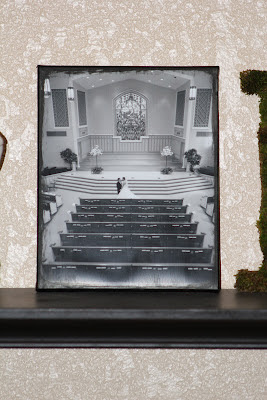
I've been wanting to make a photo canvas for a while.  We have so many amazing pictures from our wedding and honeymoon, and I wanted to do something more than throw them in a picture frame.  After reading tutorials, I finally gave it a shot and I was surprised at how easy it was!
You need:
Canvas
Mod Podge
2 Paintbrushes
Paint (any color)
Scissors or paper cutter

First you need to paint the edges of the canvas the color you selected.  Also, you should paint the top of the canvas about an inch in from the edges (in case your photo is slightly smaller than the canvas).

While the paint is drying, trim your photo to the desired size.  I wanted mine to be slightly smaller than the 8" x 10" canvas.

After the paint is dry, spread mod podge on the front of the canvas and apply the photo.  Press the photo onto the canvas, rubbing out and rippling or bubbles that appear. I turned mine over and rubbed the paint bottle on the back.


Now spread Mod Podge on top of the photo and down the sides that you painted. At first it will appear white (don't worry! This is normal!), but dries clear. I spent a little bit of time on this step making sure that I had even strokes. While it dries clear, you can see the brush strokes if you look carefully.
Note: Make sure the paint is completely dry before you start using the Mod Podge. If you go over a wet spot you will smudge your photo.


I used 8" x 10" pictures for this project, but I'm already planning on doing a couple of larger ones for my living room. :)